If you need to take text input in your Swift app, you will probably need a UITextField. It is exactly what it sounds like, just a field on the screen where the user types something in. When the user taps on it, the keyboard comes up from the bottom of the screen, and allows the user to start typing. Then, usually, when the user clicks outside of the UITextField, the keyboard is dismissed, and the cursor is no longer in that UITextField.
However, a common issue for many iOS programming beginners is that the last part of that story isn’t built in. If you just plop on a UITextField, and try tapping somewhere else…. nothing happens. That’s what we’re here to fix today.
Setting up the Storyboard
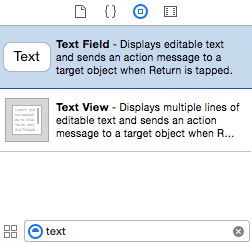
Okay, THIS post should probably have the shortest storyboard setup section so far. Start a new project, and name it “TextFieldTutorial”. Once complete, drag on a UITextField somewhere.
If you don’t want to mess with Auto Layout today, just put it in the top left. Otherwise, place it somewhere in the top area of the screen, and set up Auto Layout as appropriate. You can read the earlier post Hello World! Your first iOS App in Swift for some help on project setup and Auto Layout if you want a bit more information.
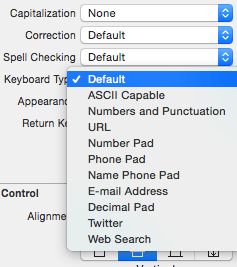
The Attributes Inspector has a lot of options that you can change for your UITextField if you wish. We aren’t going to change any of them today, but if you are curious, you can change the type of keyboard that shows up for you with the “Keyboard Type” combo-box. I’m not sure how these interact with 3rd party keyboards though. It might ask them for a version that best approximates these selections, or it might ignore them. I’ve not worked with writing any custom keyboards yet, so I have only conjecture to guide me in how this selection works with them.
That’s all. See, I told you this would be a short one. We don’t even need an outlet in your Swift file for this tutorial! If you want to actually read something from the UITextField, you’ll need one, but we’re here just to learn how to dismiss the keyboard.
Dismissing the UITextField’s Keyboard
Now, go to your ViewController’s Swift file. There are a few ways to do this, but this is the way I usually do it.
We are going to override the method touchesBegan:withEvent: for the ViewController itself. This is called when the view sees a touch event (as it begins, appropriately). In it, we are simply going to tell our main view to end editing, like so:
override func touchesBegan(_ touches: Set<UITouch>, with event: UIEvent?) {
    view.endEditing(true)
    super.touchesBegan(touches, with: event)
}
That’s all there is to it. Once you tap outside of the UITextField, the keyboard will be dismissed. How does this work? I’ll let the Apple Documentation for the endEditing method speak for itself:
This method looks at the current view and its subview hierarchy for the text field that is currently the first responder. If it finds one, it asks that text field to resign as first responder. If the force parameter is set to YES, the text field is never even asked; it is forced to resign.
This is why we didn’t need an outlet in our Swift file to the UITextField to dismiss it. This basically just asks any UITextField if it is the first responder, and if it is, tells it to resign being so.
The first responder concept is pretty much what it sounds like, though that doesn’t help much in explaining it without a bit of context. For programs using both AppKit and UIKit, there is something called the “Responder Chain”. The “first” responder is the part in that chain that responds to events first. In this case, we have a UITextField that will intercept the keyboard events when typing first. Since you clicked on the UITextField, it really should be the one handling the keyboard events, as opposed to the View that it is in, or the UIApplication itself at the top. I’m still pretty new to the concept in general, so to learn more, you can read Apple’s Responder object page.
Suffice it to say, the keyboard shows up when the UITextField is first responder, and when you ask it to resign that status, the keyboard is dismissed.
The final line call’s UITextField’s superclass to run the same method as well, which allows it to go further up the responder chain. This allows the system to handle this, and other related touch events, appropriately. If you don’t call it, then the UIResponder Class Reference suggests overriding the other touch event handling methods, at least as stub implementations. It’s probably easier to just pass it up the chain, unless you really need special handling for the Moved, Ended, and Cancelled touch event methods.
On that note, if you DID make an outlet in your Swift file, another way is to simply ask that object to resign its first responder status, if it has one:
textField.resignFirstResponder()
However, if you have more than one, and you do this in the touchesBegan method, you’ll have to ask all of them. I see both ways suggested online, and have yet to learn a good reason to use one over the other. I’m not sure if forcing it to relinquish its first responder status is necessary always either. In my tests, they both dismissed the keyboard just fine, but I’m not sure how to make UITextField say no when it is asked to resign as first responder (other than to override the method that actually provides the answer directly). You can try it out in your Swift apps with a false value if you wish, it is probably nicer to ask than to demand it resign being First Responder.
Nonetheless, it is your choice which one to use. When I learn more, I’ll update here to pass on the information if I have done this in a way that is not best practice.
This method does have some issues in other contexts, like scroll views. In those cases, you would have to add a gesture recognizer to that view, and in that gesture recognizer’s action method, you would have to call one of the above methods to dismiss the keyboard.
Conclusion
Screenshots taken from Xcode 6.1.1, code checked against version listed at top of the post.
We can talk more about using UITextField in Swift another time, as well as its delegate UITextFieldDelegate, which allows more control over what happens (most notably when editing is finished).
If you want me to cover the other ways, like the gesture recognizer style, please let me know. Also, if you feel this really shouldn’t be done with a force endEditing call, I would love to hear why, and maybe pass it on to the rest of you.
I hope you found this article helpful. If you did, please don’t hesitate to share this post on Twitter or your social media of choice, every share helps. Of course, if you have any questions, don’t hesitate to contact me on the Contact Page, or on Twitter @CodingExplorer, and I’ll see what I can do. Thanks!


