One of the most common Views used in iOS apps is the UITableView. In the default iPhone apps alone, the only ones that I didn’t easily find what is PROBABLY a UITableView was in Newsstand, Videos, Camera, and the Calculator. Even then, the first two of those appear to use UITableView’s close cousin UICollectionView. With the exception of the Settings app itself, I wasn’t even counting their settings pages (which probably all of them have, and show up as a UITableView either in their own app or via the Settings app).
You probably want to know how to use such an important view? There is too much to go into all of it today, but let’s start out with how to get one working and fill it with data.
So first, start a new Single View Application. Let’s call it the imaginative name “TableViewTutorial” (I know, creative genius, right?). Fill in the organization name and identifier as you normally would. You can set devices to whatever you want, but I left mine as “Universal”, and of course the language should be “Swift”! If you need help with this part of the tutorial, please see the post Hello World! Your first iOS App in Swift, which covers this section in much greater detail.
Set up the Storyboard
This is probably going to be the shortest storyboard setup that I’ve done on these tutorials. There are basically two ways to do this step. I am going to go for putting a UITableView into a normal ViewController. There is another object called the UITableViewController as well. If you want ONLY a UITableView on your screen, and that’s it (well, besides a UINavigationController or UITabBarController), then you can choose this option. I’ve run into issues if I wanted to add something else to the screen like a toolbar, which you cannot do in a UITableViewController. While we won’t be taking advantage of the benefits of using a UITableView in a normal UIViewController in this post, I felt it best to show the most flexible form. If you understand how to do it with this version, than using a UITableViewController will be a piece of cake.
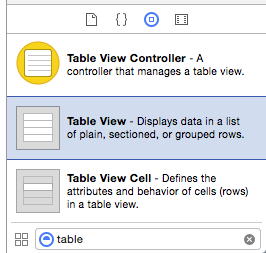
So, as the above paragraph is talking about, drag a UITableView from the Object Library and put it onto your ViewController in the Main.storyboard file.
Remember it is the “Table View” object, shown in blue in the picture above. It is NOT the “Table View Controller” with the yellow circle on the left side.
When you drag it onto your ViewController, the Table View will expand to fill it. Align it to have it centered in your ViewController. Now you will have a beautiful gray screen that says “Table View Prototype Content”.
With the Table View itself selected, go to the Attributes Inspector, and change the number of Prototype Cells to “1”.
Now it’s looking a little more like a UITableView. Select the new UITableViewCell (shows up as “Table View Cell” in the Document Outline). In the Attributes Inspector, change it’s Style to “Basic”, and give it the Identifier “TextCell”.
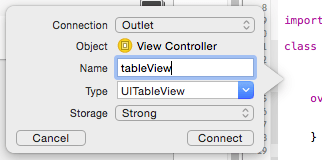
Open the Assistant Editor, and Ctrl+Drag from your UITableView to somewhere in your code. We are making an outlet for the UITableView in our ViewController code, so that we can access it to modify things.
With that, we should be done in the Storyboard. Now, TO THE CODE!
Filling the UITableViewController
Now here, there are a few ways to do this one. We’ll go over the EASIEST way today, but it may not be the best. To use a UITableView, you have to create objects that will serve as the DataSource and Delegate to it. The DataSource does what it says, it is what the UITableView will talk to in order to know what data to show in the UITableView. The Delegate is primarily to control HOW this data is displayed. There is a bit of overlap, and the Delegate often needs to talk to the DataSource as well, but this is what I have seen thus far as the difference between the two.
In this tutorial, we are going to make this ViewController be the DataSource and the Delegate. Is this really the job of the ViewController? I’m still trying to figure that out myself. In one app I’ve been working on, I’ve split up the DataSource and the Delegate to two separate files outside of the main ViewController file. Since the delegate has to request information from the DataSource though, I have the Delegate taking in the DataSource as an injected dependency. I’ve heard that since they talk so much, it might be best to have the Delegate and the DataSource be in the same class, but have that class file separate from your ViewController itself. In short, today we will have 1 class to rule them all. It can be split to 3 (separate ViewController, DataSource, and Delegate), but due to dependency between the DataSource and Delegate, it might be best to use 2 (ViewController and combined DataSource and Delegate).
For a class to be able to be used as a UITableView’s DataSource or Delegate, they must adopt the UITableViewDataSource and UITableViewDelegate protocols, respectively. Since this tutorial will just have our ViewController do so, we add those to the class’s definition after the class’s type:
class ViewController: UIViewController, UITableViewDataSource, UITableViewDelegate
Now you should probably see an error show up in your sidebar, and it says:
Type ‘ViewController’ does not conform to protocol ‘UITableViewDataSource’
Which is absolutely right. We said that it adopts the protocol, but we have not put in the required methods to actually conform to it yet.
We’ll cover that soon enough, but let’s finish a little setup first, since we’ll need some of it in our implementation of the appropriate methods.
First, we actually need a data source for this UITableViewDataSource. Let’s just create an array, hard-coded with a few Swift Strings, which for illustrative purposes, let’s fill in with names of Swift Programming websites. Outside of any method, create the array like so:
let swiftBlogs = ["Ray Wenderlich", "NSHipster", "iOS Developer Tips", "Jameson Quave", "Natasha The Robot", "Coding Explorer", "That Thing In Swift", "Andrew Bancroft", "iAchieved.it", "Airspeed Velocity"]
Also, remember setting that identifier for our prototype cell? We need to use that in the code in a little bit, and it is a whole lot easier to create a constant for this identifier and use it everywhere else. That way, if you ever decide to change the identifier, you only have to change it in interface builder and this constant’s declaration. If you used the straight string everywhere, you would have to change it everywhere you rewrote that string. Here, the name of the constant will be the same, and so even if the Swift String inside it is different, the code referring to the constant itself does not need to change. So while we’re here, let’s add that outside of any method as well:
let textCellIdentifier = "TextCell"
Then, in the viewDidLoad method, let’s set our tableView’s DataSource and Delegate to be this class itself:
override func viewDidLoad() {
    super.viewDidLoad()

    tableView.delegate = self
    tableView.dataSource = self
}
Conforming to UITableViewDataSource
Now, to conform to UITableViewDataSource, you must implement 3 methods:
- numberOfSectionsInTableView:
- tableView:numberOfRowsInSection:
- tableView:cellForRowAtIndexPath:
Andrew Bancroft made a great resource for these on his post Swift UITableViewDataSource Cheat Sheet, with their full function prototypes and some default implementations to get you started. We’ll cover implementations a little more specific to our example in this post, but I’m glad he made a cheat sheet for them.
UITableView’s can be broken up into different sections. You can see a great example of how that’s done in the iOS Settings app. Our app currently does not have a need for multiple sections, so for now, let’s just hard code that to 1:
func numberOfSectionsInTableView(tableView: UITableView) -> Int {
    return 1
}
Next, we need to let the UITableView know how many rows are going to be in each section. Since there is only 1 section in our UITableView, we’ll ignore that part. However, inside that section, we have as many rows as we have elements in the array, so we’ll return the count of the elements in our array here:
func tableView(_ tableView: UITableView, numberOfRowsInSection section: Int) -> Int {
    return swiftBlogs.count
}
Finally, we come to the most important method, tableView:cellForRowAtIndexPath:. Learn to love this one, because you will be here a lot in apps that use UITableViews in them. Here you will get a reference to the tableView requesting this information, and the indexPath it is looking for it on. It then needs a fully setup UITableViewCell returned.
What we have to do is generate a UITableViewCell based off of our prototype we made in the storyboard, set its text, and return it. We do that like so:
func tableView(_ tableView: UITableView, cellForRowAt indexPath: IndexPath) -> UITableViewCell {
    let cell = tableView.dequeueReusableCell(withIdentifier: textCellIdentifier, for: indexPath)

    let row = indexPath.row
    cell.textLabel?.text = swiftBlogs[row]

    return cell
}
That first line is a bit of a doozy, but we’ll go through it. To help make things more efficient, instead of creating a new cell every time, you dequeue a reusable one. If none exist, like when the program first runs, this will actually create the new UITableViewCells. After that though, if the user scrolls the tableview down, some UITableViewCells go offscreen on top, and new ones come below.
At that point, which is more important, leaving that cell in memory, ready in case the user scrolls back suddenly to see what they just passed by, or the cells that are being shown as the user continues to scroll down? Probably the ones the user is about to see.
So, to save having to waste processor cycles creating a new UITableViewCell object, and RAM to hold offscreen ones in case the user scrolls back, the system will decide to return one of those already created, but offscreen UITableViewCells when dequeueReusableCellWithIdentifier is called.
Using that identifier constant we created earlier, we request a cell based off of our prototype.
Since the original writing of this post, UITableView’s API has been updated. The method dequeueReusableCellWithIdentifier:forIndexPath used to return an object of the type AnyObject, which we had to typecast back into a UITableViewCell. Now, it just returns a a UITableViewCell object itself, so no type casting is required in this tutorial. If you had a custom UITableViewCell, that has more than just what the basic one offers, you would have to type cast there to set the properties associated with that custom cell, but in this app, we just use the basic style. You can read more about type casting in the previous post Type Casting in Swift.
There are actually two versions of this method, the other one does not have indexPath as a component. I am still new to it, but according to this Stack Overflow thread, the major difference is how the reusable cells are registered (which the Storyboard handles for us in our tutorial’s case), and how it reacts.
Apparently if we create our cell prototype in code, and did not register it as a reusable cell, the older (non-indexPath) method return nil. This one asserts to crash the program (on purpose to make this error VERY obvious). I think the indexPath inside helps with sizing and preparing the cell in some other ways, but I’m really not sure entirely what the indexPath is used for in this form (so far).
As far as UITableView is concerned, an NSIndexPath is a way for the system to refer to a specific row in a specific section. In the more general case (according to NSIndexPath Class Reference) “The NSIndexPath class represents the path to a specific node in a tree of nested collections.” So in our next line, we save the “row” property of this indexPath to a local Swift Int constant also named “row” (mostly for readability).
Then, we set the text of the cell’s textLabel to a value from our swiftBlogs array, using the indexPath’s “row” as the index in our swiftBlogs array lookup.
Finally, we return this cell.
Conforming to UITableViewDelegate
You may notice that now that we have implemented those 3 methods for the UITableViewDataSource protocol, we have no errors relating to not conforming to the UITableViewDelegate protocol. That is because all of the methods in the UITableViewDelegate protocol are optional, you don’t have to implement any of them. However, there are some you probably will in most UITableViews. The most prominent of them is tableView:didSelectRowAtIndexPath:. As its name suggests, this is called when a user selects a row at a specific indexPath (by tapping on it). Here, we’ll simply print out what the user tapped on to the console:
func tableView(_ tableView: UITableView, didSelectRowAt indexPath: IndexPath) {
    tableView.deselectRow(at: indexPath, animated: true)

    let row = indexPath.row
    print(swiftBlogs[row])
}
The first line deselects the row that was just selected. If we don’t do this, the row will stay selected until another one is, leaving it highlighted. It looks better having it highlighted temporarily, and then putting the text to the console.
The next lines should look familiar from tableView:cellForRowAtIndexPath:, getting the row out of the indexPath. We then use that row in the swiftBlogs array again, but this time send that Swift String to the println function.
The app is finally done, run it, and you should have a UITableView filled with the names of Swift websites that will print out the selected one to the console when tapped.
For completeness sake, here is the full code for ViewController.swift:
import UIKit

class ViewController: UIViewController, UITableViewDataSource, UITableViewDelegate {

    @IBOutlet var tableView: UITableView!

    let textCellIdentifier = "TextCell"

    let swiftBlogs = ["Ray Wenderlich", "NSHipster", "iOS Developer Tips", "Jameson Quave", "Natasha The Robot", "Coding Explorer", "That Thing In Swift", "Andrew Bancroft", "iAchieved.it", "Airspeed Velocity"]

    override func viewDidLoad() {
        super.viewDidLoad()

        tableView.delegate = self
        tableView.dataSource = self
    }

    // MARK:  UITextFieldDelegate Methods
    func numberOfSectionsInTableView(tableView: UITableView) -> Int {
        return 1
    }

    func tableView(_ tableView: UITableView, numberOfRowsInSection section: Int) -> Int {
        return swiftBlogs.count
    }

    func tableView(_ tableView: UITableView, cellForRowAt indexPath: IndexPath) -> UITableViewCell {
        let cell = tableView.dequeueReusableCell(withIdentifier: textCellIdentifier, for: indexPath)

        let row = indexPath.row
        cell.textLabel?.text = swiftBlogs[row]

        return cell
    }

    // MARK:  UITableViewDelegate Methods
    func tableView(_ tableView: UITableView, didSelectRowAt indexPath: IndexPath) {
        tableView.deselectRow(at: indexPath, animated: true)

        let row = indexPath.row
        print(swiftBlogs[row])
    }
}
As a note, the “// MARK: ” comment is there to make using the jump bar easier. The jump bar is the bar above the main editor window that shows the Project, Group (Folder), File, and then method that the cursor is currently in. You can change any of them by clicking on the section you want to change, to go to that part. In the method part, you will see what was written in the “// MARK” comment shows up as a kind of separator in the list, making it really easy to find what you grouped together, like the methods for UITableViewDataSource, for example.
Conclusion
Screenshots taken from Xcode 6.1.1, code checked against version listed at top of the post.
UITableViews are an integral part of many apps. In many of them, when you select a row, it will go to another screen to do something with it (like clicking on a song row in the Music app, goes to the “Now Playing” screen and starts playing that song).
Stay tuned for another tutorial soon about that, but those that want to try it for themselves, just think of what would happen if you put a certain UITableViewDelegate method together with what we learned in the earlier post Segue between Swift View Controllers.
That post has been written now, so check it out here — Segue from UITableViewCell Taps in Swift.
I hope you found this article helpful. If you did, please don’t hesitate to share this post on Twitter or your social media of choice, every share helps. Of course, if you have any questions, don’t hesitate to contact me on the Contact Page, or on Twitter @CodingExplorer, and I’ll see what I can do. Thanks!
Sources
- UITableView Class Reference — Apple Inc.
- UITableViewDataSource Protocol Reference — Apple Inc.
- UITableViewDelegate Protocol Reference — Apple Inc.
- When to use dequeueReusableCellWithIdentifier vs dequeueReusableCellWithIdentifier : forIndexPath — Stack Overflow
- NSIndexPath Class Reference — Apple Inc


