In many apps that use a UITableView, when a UITableViewCell is tapped, the screen will segue over to another view, such as how choosing a song in the Music app goes to the Now Playing screen, and plays that song, shows the album art, and other metadata about the song. This can be done programmatically in tableView:didSelectRowAtIndexPath:, but with Storyboards, it is even easier. All we have to do is set up a segue, and treat it pretty much exactly like we did in Segue between Swift View Controllers.
To avoid an even longer setup section, and to not cover things we already covered, we’re going to start with the result of the previous post Getting Started With UITableView in Swift.
Anyway, starting from where we left off, let’s set up the storyboard.
Setting up the Storyboard
Our last version of this tutorial had a UITableView list off a number of Swift blogs. This tutorial is going to be a very simple extension if it, where when the user taps on a cell, it will load another view controller that will state which blog it is about in a UILabel. It would probably be fancier to actually put a UIWebView in here and actually load the page, but we aren’t here to learn about UIWebViews today, we’re here to learn about segueing from a UITableViewCell and customizing that next view controller.
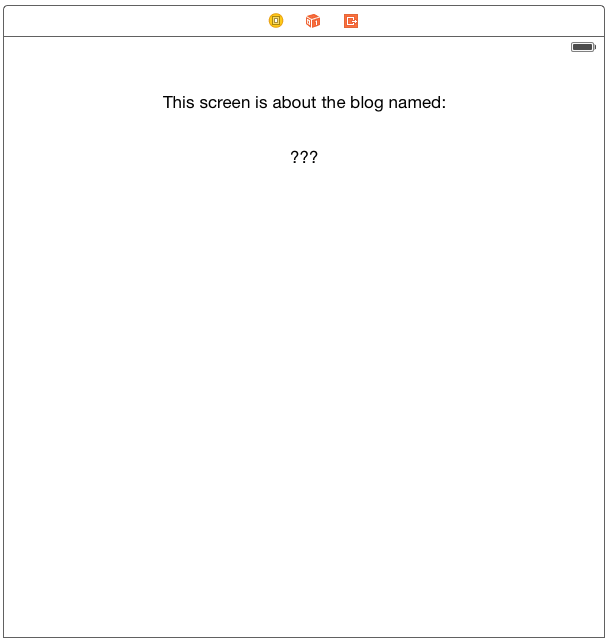
As such, let’s make up a simple view controller that just has 2 UILabels, one static one to say that this screen is about a blog, and the other one we’ll update to the blog we want to talk about, set it up to look like so:
If you want to make it pretty with Auto Layout, set the top UILabel to center horizontally, with space to the top margin. Then tell the second UILabel to align it’s center with the top one, and have some vertical space between them as well. You can read up a bit more about using Auto Layout in the post Hello World! Your first iOS App in Swift.
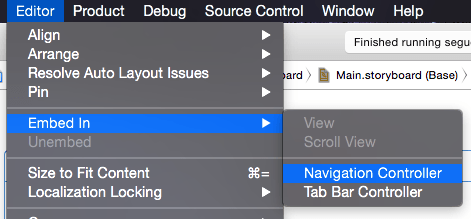
Next, we’re going to push to this view in a UINavigationController, so let’s embed our initial View Controller with the UITableView in it in a Navigation Controller. So, select the first view controller, and then go to the top menu and click on Editor → Embed In → Navigation Controller.
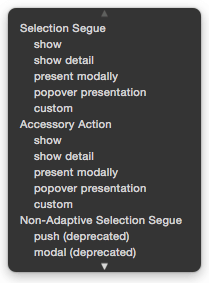
Just to note, that screenshot was taken when this post was originally written (6.1.1), so the menu above is lacking the option of “Stack View”, be we aren’t using it in this tutorial anyway. With that done, we then make a segue from the prototype UITableViewCell (either directly in the storyboard, or through the Document Outline, both will work). Ctrl+Drag from the UITableViewCell to our new view controller. You will then be presented with this dialog about what segue to create:
For this, we are going to select the “show” segue in the “Selection Segue” section. This means that when you tap on the cell, it will cause this segue to happen. If you use the “Accessory Action” one, that will be what happens if they tap on the accessory of the UITableViewCell. For instance, in Marco Arment‘s Overcast App, on the right side of a podcast in the podcast episode list, there is a little “i” information symbol in the accessory view area. If you tap anywhere else in the cell, it starts playing that podcast, and goes to the “Now Playing” screen. If you tap that little “i” symbol, it will show a popover with additional information about that podcast episode. If I had to guess, that is done with the “popover presentation” in the “Accessory Action” section above, but I have not tested this yet.
Select that segue, and in the Attributes Inspector, give it an identifier with the name “ShowBlogSegue”:
We’re going to need a custom class for our new view controller, so create one from the top menu via File → New → File…, in which we will create a “Cocoa Touch Class” in the iOS → Source section. Make sure it is a subclass of “UIViewController”, and name it “BlogViewController”. After that, go back to the Storyboard, select the second View Controller, and go to the “Identity Inspector” in the Utility pane. In there, set the Class to our new class “BlogViewController”.
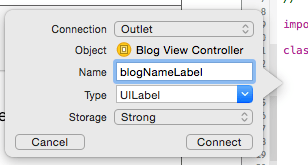
Now, select the BlogViewController on the storyboard and open the Assistant Editor, and you should see BlogViewController.swift as the correct counterpart in that text editor. Ctrl+Drag from our “???” UILabel onto there, and create an outlet named “blogNameLabel”.
We’re almost done. This last thing is just cosmetic, but if a UITableViewCell pushes a new view over the UITableView’s view controller, it is customary for it to have a “>” accessory, called a “Disclosure Indicator”. Tapping this accessory won’t do anything different for this app, but it’s best to follow convention in how it should look. So, select the UITableViewCell prototype, and change it’s “Accessory” to “Disclosure Indicator” in the Attributes Inspector.
With that, now let’s get to the code.
Set up Destination View Controller
Now, click on “BlogViewController.swift” and let’s get this one set up. We’ll need a variable to place the Swift String of the blog name. We will use that in viewWillAppear to set the text of the blogNameLabel outlet we made earlier:
var blogName = String()

override func viewWillAppear(_ animated: Bool) {
    blogNameLabel.text = blogName
}
That’s it for BlogViewController.swift
PrepareForSegue in Main View Controller
This will look pretty familiar to those that read Segue between Swift View Controllers, but there is one new thing. We need to get the index for the cell that was tapped, so we can get the Swift String associated with it from the swiftBlogs array. We’ll do that with the tableView method “indexPathForSelectedRow()”. This results in the code below:
let blogSegueIdentifier = "ShowBlogSegue"

// MARK: - Navigation
override func prepare(for segue: UIStoryboardSegue, sender: Any?) {
    if  segue.identifier == blogSegueIdentifier,
        let destination = segue.destination as? BlogViewController,
        let blogIndex = tableView.indexPathForSelectedRow?.row
    {
        destination.blogName = swiftBlogs[blogIndex]
    }
}
So first, we set a constant for the “ShowBlogSegue” identifier. Inside of prepareForSegue, we check if that is the identifier for the segue requested. If it is, we type cast the destination View Controller to a BlogViewController type, if that indeed is what it should be. Then, we’ll save the row from the NSIndexPath returned from tableView.indexPathForSelectedRow(). It returns an optional, if somehow the indexPath was invalid, so we optionally bound it to the “blogIndex” constant.
Finally, when all of that is done, we set the “blogName” property of the destination View Controller to the Swift String stored in the swiftBlogs array, at the blogIndex we just got.
With that done, run your program, and you should be able to tap on the different blogs in the UITableView and segue over to the BlogViewController to see which one was tapped on.
Note about AutoLayout and Size Classes
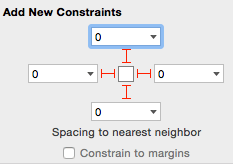
When I was testing this, at this point, everything worked fine at this point, but I noticed that I couldn’t see the disclosure indicators. Turns out it was an issue with Auto Layout and Size classes that I just forgot to deal with earlier. You can see the disclosure indicator just fine in the editor, but notice that the box is much wider than a normal iPhone interface? So if you aren’t seeing the disclosure indicators, they probably are THERE, but they’re farther to the right than your screen is showing. I just simply selected the UITableView from the Document Outline, and Pinned all of its sides (top, bottom, left and right) to 0 with “Constrain to margins” off.
Then just run again, and your disclosure indicators should be visible.
Code for UITableViewCell Segue Tutorial View Controllers
For the sake of completion, here is the code for both view controllers:
ViewController.swift
import UIKit

class ViewController: UIViewController, UITableViewDataSource, UITableViewDelegate {

    @IBOutlet var tableView: UITableView!

    let textCellIdentifier = "TextCell"

    let blogSegueIdentifier = "ShowBlogSegue"   //New

    let swiftBlogs = ["Ray Wenderlich", "NSHipster", "iOS Developer Tips", "Jameson Quave", "Natasha The Robot", "Coding Explorer", "That Thing In Swift", "Andrew Bancroft", "iAchieved.it", "Airspeed Velocity"]

    override func viewDidLoad() {
        super.viewDidLoad()

        tableView.delegate = self
        tableView.dataSource = self
    }

    //New
    // MARK: - Navigation
    override func prepare(for segue: UIStoryboardSegue, sender: Any?) {
        if  segue.identifier == blogSegueIdentifier,
            let destination = segue.destination as? BlogViewController,
            let blogIndex = tableView.indexPathForSelectedRow?.row
        {
            destination.blogName = swiftBlogs[blogIndex]
        }
    }

    // MARK: - UITextFieldDelegate Methods
    func numberOfSectionsInTableView(tableView: UITableView) -> Int {
        return 1
    }

    func tableView(_ tableView: UITableView, numberOfRowsInSection section: Int) -> Int {
        return swiftBlogs.count
    }
    func tableView(_ tableView: UITableView, cellForRowAt indexPath: IndexPath) -> UITableViewCell {
        let cell = tableView.dequeueReusableCell(withIdentifier: textCellIdentifier, for: indexPath)

        let row = indexPath.row
        cell.textLabel?.text = swiftBlogs[row]

        return cell
    }

    // MARK: - UITableViewDelegate Methods
    func tableView(_ tableView: UITableView, didSelectRowAt indexPath: IndexPath) {
        tableView.deselectRow(at: indexPath, animated: true)

        let row = indexPath.row
        print(swiftBlogs[row])
    }
}
BlogViewController.swift
import UIKit

class BlogViewController: UIViewController {

    @IBOutlet var blogNameLabel: UILabel!

    var blogName = String()

    override func viewWillAppear(_ animated: Bool) {
        blogNameLabel.text = blogName
    }

    override func viewDidLoad() {
        super.viewDidLoad()
    }
}
Conclusion
Screenshots taken from Xcode 6.1.1, code checked against version listed at top of the post.
In the previous post, I had mentioned about using tableView:didSelectRowAtIndexPath:. You can use that if you are doing this programmatically, but since we have Storyboards at our disposal, I realized that would be a much better way to handle this.
I hope you found this article helpful. If you did, please don’t hesitate to share this post on Twitter or your social media of choice, every share helps. Of course, if you have any questions, don’t hesitate to contact me on the Contact Page, or on Twitter @CodingExplorer, and I’ll see what I can do. Thanks!


