So, last time we learned how to make a simple Hello World app on a single view controller. As fancy as it was, you probably want more than one screen in your app, right?
Perhaps you want a way to segue into the next screen?
That’s what we’re going to go over today, as well as one of the simple ways to share data between view controllers.
Setting up the Storyboard
So, first let’s make a new project. We’ll call this one “SegueTutorial”. If you need help setting up an Xcode project, please see the previous post “Hello World! Your first iOS App in Swift”.
Unlike the last tutorial though, we’re not going to mess with Auto Layout here. Let’s leave Auto Layout and Size Classes on, but I’m not going to cover where to pin or align things like I did last time. If you want though, you are certainly welcome to set them yourself. If you want to be lazy though, you can put any controls into the top left corner to make sure they will appear onscreen for an iPhone. Of course don’t do that for an actual app after initial prototyping, but for now, let’s just look into how to use segues.
On our initial View Controller let’s drag out 2 buttons. One is going to be used to generate some data for us, while the other one will send us to the other View Controller. For the one to make data, change that one’s text to the numeral “0”. We will click that one and increase its number each time. When we go to the other view controller, we’ll send that number to the other view controller to display there. We could use a textfield, but then we’d have to deal with hiding the keyboard when done, and that issue should probably have a post of its own.
For the other button, you can change it to whatever you want, but for the purposes of this tutorial, I suggest to name it verbosely: “Go to Other View Controller”.
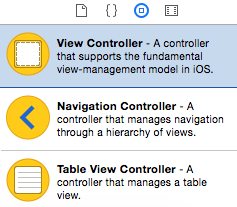
Next, from the Object library, drag out a “View Controller” object.
When your cursor goes over the main editor area, the description will balloon up to show another big box similar to the one you already have in the editor. Drop it somewhere to the right of your existing “View Controller”.
In this new View Controller, let’s put in a label. The label will show the number generated in the previous view controller. Change the text of the label to “The counter was tapped ??? times.” This will make it easier to size it large enough to show at least a 3 digit number without having to make the label bigger.
Wiring up the Segues
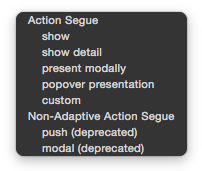
Remember Ctrl+Dragging from last time? There we used it to make outlets and actions in our code. Well, in addition to that, Ctrl+dragging also helps set up segues. So, Ctrl+Drag from the “Go to Other View Controller” button, to somewhere in the second View Controller. It can be anywhere in the main box of the second view controller. When you release, it will show you a box like the one below.
This lets you set what kind of segue you want to use. I would recommend sticking with those in the “Action Segue” section. They are new in iOS 8, and work better with the new Adaptive Layout than the deprecated ones below. What do each of these mean?
- Show — When the View Controllers are in a UINavigationController, this pushes the next View Controller onto the navigation stack. This allows the user to click the back button to return to the previous screen through the back button on the top left of the Navigation Bar. Basically the adaptive form of “push”
- Show detail — When the View Controllers are in a UISplitViewController, this will replace the detail view side of the UISplitView with the next View Controller.
- Present modally — This presents the next view controller in a modal fashion over the current View Controller. This one doesn’t need to be part of a UINavigationController or a UISplitViewController. It just shows the destination View Controller in front of the previous one. This is usually used when the user has to either Finish or Cancel what they are doing, where leaving partway through doesn’t make as much sense. When you set up a new contact in the Contacts app, that is presented modally. Leaving partway through doesn’t make sense, you are either creating a new contact or you are not.
- Popover presentation — On an iPad, this shows the new View Controller over the previous one in a smaller box, usually with an arrow pointing to which button created the popover. When used on an iPhone, it is not much different than the “Present Modally” segue by default, but can be configured to act more like an iPad one.
- Custom — Exactly what it sounds like. You can make your own segue style and transitions and use it here. I have not dove into this yet, so I don’t know much more than that…. so far.
For now, let’s use the “Show” segue. Also, remember how I said that this one needs a UINavigation Controller? Well, it doesn’t NEED one, it seems, running this as-is appears to show the sheet modally if there is no UINavigationController, but that’s not what we want in this tutorial, and isn’t really what “Show” is for.
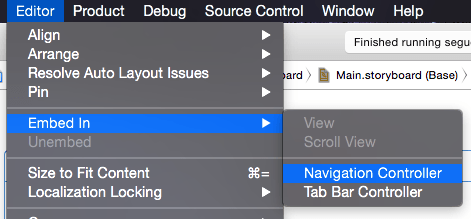
Xcode makes it really easy to put these in a UINavigationController. You could drag one out from the Object Library and wire it all up yourself…. or you can take a shortcut.
Highlight one of your first View Controller by clicking somewhere near the top of it (above the status bar, but not on the 3 icons in the center of the top. Go to the top menu and click on Editor → Embed In → Navigation Controller. This will wrap that current set of segues into a NavigationController, with all of the appropriate changes done for you.
There is something that I kept messing up when I was learning this: Make sure when you do this that only ONE View Controller is selected.
I used to highlight the whole line that I wanted in the Navigation Controller, and it would show the Embed In → Navigation Controller option greyed out. Only have the first View Controller in your Navigation stack selected when Embedding in a UINavigationController.
Also, if you when you do the embedding, a new Navigation Bar will appear and it might cover your buttons and labels if you are not using Auto Layout. Simply highlight over them (even the one that is now blocked), and click and drag one that you can see. For me, it covered the top one and some of the bottom one, so I could still drag from the part of the bottom one I could still see. Just goes to show, you really should use Auto Layout.
Now, out first View Controller in the storyboard has a type already associated with it. It is tied to the ViewController.swift file that was generated for us. The new one however, is tied to a default UIViewController object provided by Cocoa. If we want to be able to set that label, we need to be able to make an outlet to it in code. For that, we need to create a new Swift file to make this View Controller that type.
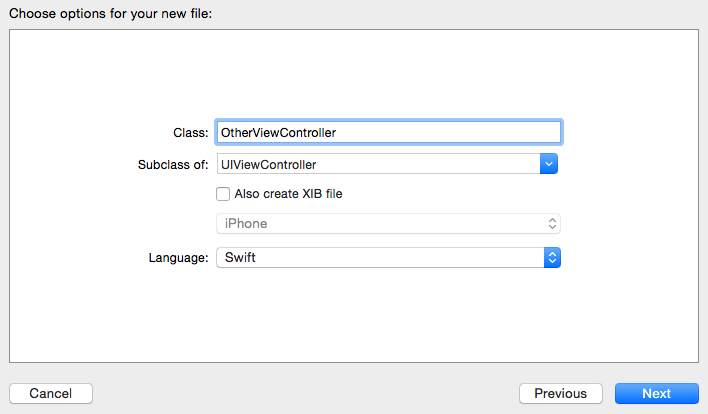
So, go to “File → New → File…”, and and in the “iOS → Source” section, select “Cocoa Touch Class”. Then in there call this Class “OtherViewController”, and make sure to set the “Subclass of” to “UIViewController”. It will try to append this to what is type above, so I actually set the Subclass first, and then wrote “Other” before it. It is good practice to have ViewController at the end of the names of your ViewController subclasses.
You can leave the rest as default. Don’t create a XIB, the “iPhone” combo box there is greyed out, so it doesn’t matter, and of course have your language set to Swift! It will then ask you where to save this, so choose wherever you want.
Once done, it will show you the OtherViewController.swift file instead of the storyboard. We aren’t QUITE done on the storyboard, so let’s go back and finish. Select the second View Controller, and then go to the “Identity Inspector” in the Utility Pane. It’s the icon that looks like a card with a picture in the top left corner and some writing everywhere else (it’s selected in blue in the screenshot below). In there, set the “Class” part of the “Custom Class” section to our shiny new “OtherViewController. If it is a compatible subclass (in this case of UIViewController), it will accept it. It will also probably autocomplete once you start typing a compatible class.
Finally, click on the segue’s icon that is between the first and second view controller we made. It is the circle on the arrow between our two View Controllers. It actually looks different depending on which Segue is used. Below is what our “Show” Segue looks like:
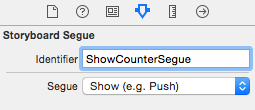
Once selected, in the Attributes Inspector of the Utilities pane, name the segue something in the “Identifier” text field. Let’s name it “ShowCounterSegue” we will need to check for this later in the code.
There, now the storyboard is ready for some code.
Writing the View Controllers
Now we’ll need a few things to access our labels and buttons in the code. Close the utilities pane (to give some more room) and open up the Assistant Editor.
ViewController.swift Part 1
For our first View Controller, we need to wire up an action to our counter button, and nothing to our “Go to Other View Controller” button. We don’t need anything for the second button, because the segue it is causing is the action we want. We will be working with that segue soon enough.
Make sure you set it to be an “Action” and not an outlet. Also, when doing this, you could set up an outlet to it as well to change the number on the button, but if you set this action’s sender “type” to be “UIButton” you can actually use a shortcut and assign right to the sender, being the button itself. I messed up a few times writing this accidentally making it an outlet when I meant action though, so I’m just warning you.
If you do accidentally make an outlet you don’t want, make sure to remove the reference to that outlet on your button. Only deleting the text is not enough. You must Ctrl+Click (or right-click) on the button, and click the little X on the outlet in the “Referencing Outlets” section that no longer exists. If you don’t, you get a nice error saying that it can’t find the code to tie the Outlet to (which was deleted). Even undoing doesn’t remove this, so you do have to do this manually if you make the mistake, like me.
Anyway, also in the code, make a separate variable to hold the count, an integer that we will use to update the button’s text with. In the action, simply increment the counter variable, and then assign the text of the button to that number. You can use a String Initializer or String Interpolation to do this, the code below will use a String Initializer. If you are curious to learn more about Swift Strings, check out the previous post Swift Strings. So the code added to ViewController.swift so far is:
var counter = 0

@IBAction func incrementCounter(_ sender: UIButton) {
    counter += 1

    sender.setTitle(String(counter), for: .normal)
}
While writing this, I found setting the text of the titleLabel property is not particularly helpful. It flashes the new number, but returns to zero. You have to use this “setTitle:for:” method to correctly set the new text. UIControlState.Normal is referring to the state that the button is in when it is not pressed, highlighted, etc.
OtherViewController.swift
Now, we need to set up another variable to store the number, and make an outlet for our “The counter was tapped ??? times.” label to show when we segue to this View Controller. So Ctrl+Drag from the label to the assistant editor to make an outlet, and call it “counterLabel”. Also make an Int variable named “numberToDisplay” with a default value of zero to store our count.
This “numberToDisplay” variable will be set from our first ViewController when segueing to this one to let us now what number to display. If we were using access controls, this one should be marked as “internal”. In the first ViewController.swift, that one should be private, since nothing should be setting it outside of itself. For simplicity’s sake, we are forgoing access controls, but just so you know, while they are the same in this example, in a real app, you should probably have access controls to only expose things (with “internal” or “public”) that should be written to outside of your source file, otherwise have them marked as “private”. You can read more about access controls in the post Access Control in Swift.
Finally, we need to update this label somehow. Well, ideally we want to update the text in this label right before the view will appear to the user. To do that, we override the aptly named function “viewWillAppear”. In there, we will update our label with the value in “numberToDisplay”.
So, with all of this, the code added to OtherViewController.swift is:
var numberToDisplay = 0

@IBOutlet var counterLabel: UILabel!

override func viewWillAppear(_ animated: Bool) {
    super.viewWillAppear(animated)

    counterLabel.text = "The counter was tapped \(numberToDisplay) times."
}
The one part that wasn’t mentioned yet was the “super.viewWillAppear(animated)” line. That line calls the viewWillAppear of its superclass (in this case UIViewController itself), in case it has anything it needs to do. The “animated” argument is passing in the “animated” parameter that was given in the function’s prototype.
Now to finish the job, let’s head back to ViewController.swift.
ViewController.swift Part 2
You might have noticed a method commented out on the bottom of OtherViewController.swift called “prepareForSegue”. The way we’re doing this, we don’t need that there, but we do need it in the main ViewController.swift. In there we need to check which segue is being called first. Then, if it is the correct segue, check if the destination view controller is the type we think it should be (in this case “OtherViewController”), and then set the numberToDisplay property in that object.
The code to do this is:
override func prepareForSegue(segue: UIStoryboardSegue, sender: AnyObject?) {
    if segue.identifier == "ShowCounterSegue"
    {
        if let destinationVC = segue.destinationViewController as? OtherViewController {
            destinationVC.numberToDisplay = counter
        }
    }
}
The default implementation of prepareForSegue does nothing, so you don’t need to call super.prepareForSegue.
Remember that we named this segue back in the storyboard? The prepareForSegue method is called whenever ANY segue is called. Since we have one, technically we don’t have to do this, but when more than one segue is possible, checking against that name is how you determine which one is happening, so you can prepare appropriately. So first, we check if the identifier of the segue happening (with the segue.identifier property), is the one we think. I’m not the biggest fan of Stringly Typing, and having to copy this String from our storyboard document, but currently it is the best way to handle it. It might also be a good idea to create a constant to contain this String, so anywhere it is called in the code can use that constant. In that case though, the constant and the storyboard’s segue identifier still have to be kept in sync.
Next, we optionally bind the result of trying to cast the segue.destinationViewController to a OtherViewController (with the optional as? operator). If it is indeed able to be cast to OtherViewController (particularly because it IS one, in this case), then it can be referred to with destinationVC now. If not, the if statement evaluates to false, and just finishes the method call (since nothing else is after it in an else clause or otherwise).
Once it is bound to destinationVC, we then set that numberToDisplay property we created back in OtherViewController.swift.
Running the App
With all of that, now we can run the app. Click on the counter button a few times to set the number to something, then click the “Go to Other View Controller” button. You will see it go to OtherViewController, with the correct number of times listed in the “The counter was tapped ??? times.” label.
To go back to the previous page, you can tap the back button generated for us in the UINavigationController’s UINavigationBar, in the top left.
We did take a bit of a shortcut for this app. Since the first ViewController is kept on the stack, it remembers what the count is, and we aren’t changing it from the outside. As such, we don’t need to update it’s label with viewWillAppear and an outlet to the button to set its text. If it could be changed outside, we would have to override viewWillAppear in ViewController.swift as well.
For completion’s sake, here is all of the new code in:
ViewController.swift:
import UIKit

class ViewController: UIViewController {

    var counter = 0

    @IBAction func incrementCounter(_ sender: UIButton) {
        counter += 1

        sender.setTitle(String(counter), for: .normal)
    }

    override func prepare(for segue: UIStoryboardSegue, sender: Any?) {
        if segue.identifier == "ShowCounterSegue",
            let destinationVC = segue.destination as? OtherViewController {
                destinationVC.numberToDisplay = counter
        }
    }
}
OtherViewController.swift
import UIKit

class OtherViewController: UIViewController {

    var numberToDisplay = 0

    @IBOutlet var counterLabel: UILabel!

    override func viewWillAppear(_ animated: Bool) {
        super.viewWillAppear(animated)

        counterLabel.text = "The counter was tapped \(numberToDisplay) times."
    }
}
Conclusion
Screenshots taken from Xcode 6.1.1, code checked against version listed at top of the post.
Segues are a very important part of using Storyboards in Xcode. We can go over the different types of segues another time, but this one shows you how to use the “Show” segue, as well as how to pass data between the two view controllers to customize the second one with whatever custom data is required.
I hope you found this article helpful. If you did, please don’t hesitate to share this post on Twitter or your social media of choice, every share helps. Of course, if you have any questions, don’t hesitate to contact me on the Contact Page, or on Twitter @CodingExplorer, and I’ll see what I can do. Thanks!


